





Contour Scleral
- Primary indications: Keratoconus, Pellucid Marginal Degeneration (PMD), Post-Graft, Post-LASIK ectasia, any corneal irregularity, corneal lens intolerance.
- Secondary indications: Dry eyes, polluted work conditions, stability for sports/activities.
- Daily wear.
Design
Parameter Range:
- BC range: 4.00 to 12.50mm
- Diameter range: 13.00 to 25.00mm
- BOZD 4.0 to 12.0mm
- Power -35.00 to +35.00D
- Toric cylinder 0.00 to -10.00DC with axis 0 to 180 degrees (1 degree increments)
Design Schematic:
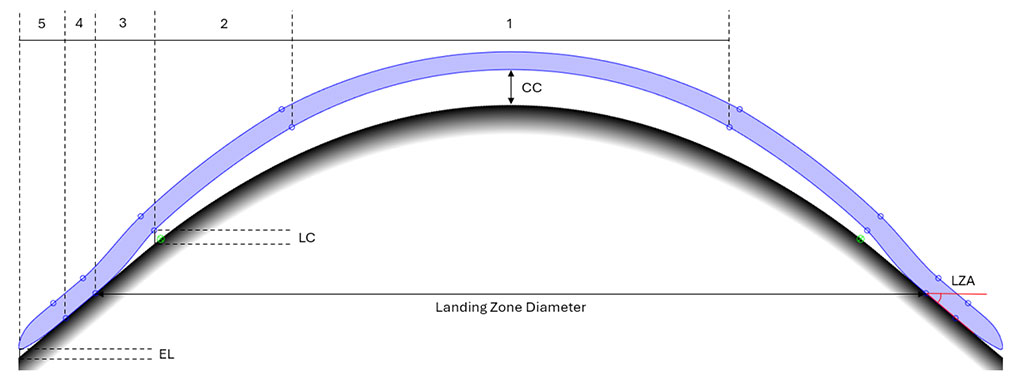
1. Back Optic Zone and Base Curve
2. Transition Zone 1
3. Transition Zone 2
4. Haptic Width
5. Edge Width
CC – Central Clearance
LC – Limbal Clearance
EL – Edge Lift
LZA – Landing Zone Angle
- All the above parameters can be modified
- The lens geometry can be spherical, toric, quadrant-specific or asymmetric
Additional options are available:
- Bitoric optic zone
- Optic zone tilting
- Optic zone decentration
- Longitudinal Spherical Aberration (LSA) within the optic zone
- Prismatic correction within the optic zone
Speak to one of our technical consultants for modification queries
NOTE: There are two “-“ laser engravings at axis 0 and 180, indicating the flat axis of the lens.
Diagnostic Set:
- 6 lenses – 4 for ectasias (CST 1-4) 2 for advanced oblate shapes (CSTG 5-6)
- BC 6.0 to 8.5mm
- Diameter 16.4mm
SAG@15mm and ΔSAG@15mm:
- CST1 3900μm and 200μm
- CST2 4150μm and 190μm
- CST3 4400μm and 215μm
- CST4 4650μm and 340μm
- CSTG5 4200μm and 210μm
- CSTG6 4450μm and 290μm
Landing zone angles of 40 degrees along 0 – 180, and 41 degrees along 90 – 270 degrees for all lenses except for CSTG6 which has a LZA of 42 degrees along 90 – 270 degrees.
Contour Scleral Fitting Procedure
Optimal Fit
An optimal fitting lens will have the following features:
- The lens does not bear on or touch the cornea.
- The base curve selected matches anterior corneal curvature.
- Apical clearance of no less than 100 microns. Please note that the apex of the cornea may not be centrally located.
- Small amount of clearance over the limbus (approximately 10-50μm).
- The lens lands on the conjunctiva/sclera, approximately 1mm from the limbus.
- The haptic of the lens is parallel to the sclera.
- The lens is rotationally stable.
Step 1: Diagnostic Lens Selection
Objective: Select a lens that achieves an apical clearance of approximately 200-300μm upon insertion.
- Diagnostic lenses are labelled Mild, Moderate, Advanced or Severe to help select the initial lens.
- Use CST1 to CST4 for prolate eye shapes e.g. Keratoconus and PMD.
- Use CSTG5 and CSTG6 for advanced oblate eye shapes e.g. very flat central cornea but steep peripheral cornea. For mild grafts, consider using CST1 and CST2.
- If in doubt, select a diagnostic lens with a base curve closest to Flat K.
- Fill the lens to the brim with preservative-free saline or an appropriate alternative solution.
- Insert the lens whilst the patient is in a face-down position with the thumbprint laser engraving positioned at the bottom (6 o’clock).
- Assess the clearance of the lens with an anterior OCT or with sodium fluorescein. If sodium fluorescein is being used to assess the lens, instil the fluorescein into the bowl of the lens before insertion.
- If the lens shows any bearing on the cornea, remove the lens and insert another diagnostic lens with a higher SAG.
- Measure the post-lens tear layer thickness along the steep and flat meridians of the lens. It is helpful to measure the apical clearance (clearance over the apex of the cornea) in addition to the central clearance. If the lens is being assessed on a post-graft eye, measure the clearance over the host-graft junctions along the steep and flat meridians in addition to the central clearance.
Step 2: Mid-peripheral Fit
Objective: Assess the peripheral fit over the limbus and on the conjunctiva/sclera.
- Using an anterior OCT, scan over the limbal areas along the flat and steep meridians of the lens.
- OCT scans should ideally show both the limbal area and the landing of the lens on the conjunctiva/sclera.
- The patient should look straight ahead whilst these scans are being taken.
- The superior and inferior eyelids may need to be pulled out of the way to scan the superior and inferior limbal and landing zones.
- If there is difficulty obtaining good scans peripherally, the patient can look slightly in the opposite direction of the area needing to be scanned. E.g. The patient can look slightly nasal to help obtain a temporal peripheral scan.
- If the landing zone angle appears too steep/flat, order the initial lens with a +1/ -1 degree increase/decrease to the LZA. e.g. Changing the flat LZA from 40 to 41 makes the angle steeper
- If the lens does not have enough/has too much sagittal toricity, order the initial lens with an increase/decrease ΔSAG. This can be specified in microns. E.g. increase ΔSAG by 100 microns.
- If the landing zone lands too close/too far away from the limbus, order the initial lens with an increased/decreased landing zone diameter.
- If the lens is settling too much/not enough (floating), order the initial lens with an increase/decrease to the haptic width.
Evaluating Vision
- Perform a sphere-cyl over-refraction over the chosen diagnostic lens.
- Note the rotation of the lens so that the cylinder axis is adjusted accordingly.
Contour Scleral Handling
Lens Insertion
- Place the lens concave side up onto a scleral cup OR on the thumb, index and middle finger of the dominant hand (tripod method).
- Fill the lens with non-preserved saline solution or other appropriate scleral insertion solution.
- Have the patient position their head face down, parallel with the floor and apply the lens centrally to the cornea.
If an insertion bubble is present, remove and re-insert the lens.
Lens Removal
- Have the patient place their index finger on the lower lid margin and gently push under the bottom edge of the contact lens to introduce an air bubble under the contact lens.
- Place a wetted DMV Ultra or similar suction tool below the midline of the contact lens.
- Remove the lens by pulling outwards in an arc upwards.
Patients should not have lenses dispensed until they have shown competence in both insertion and removal.
Warning: Do not attempt to remove the lens with the DMV Ultra placed centrally on the lens.
Anterior OCT Scan Examples
The two following images show central scans assuming the lens does not rotate.
Note: the green lines show where it would be beneficial to measure the clearance.
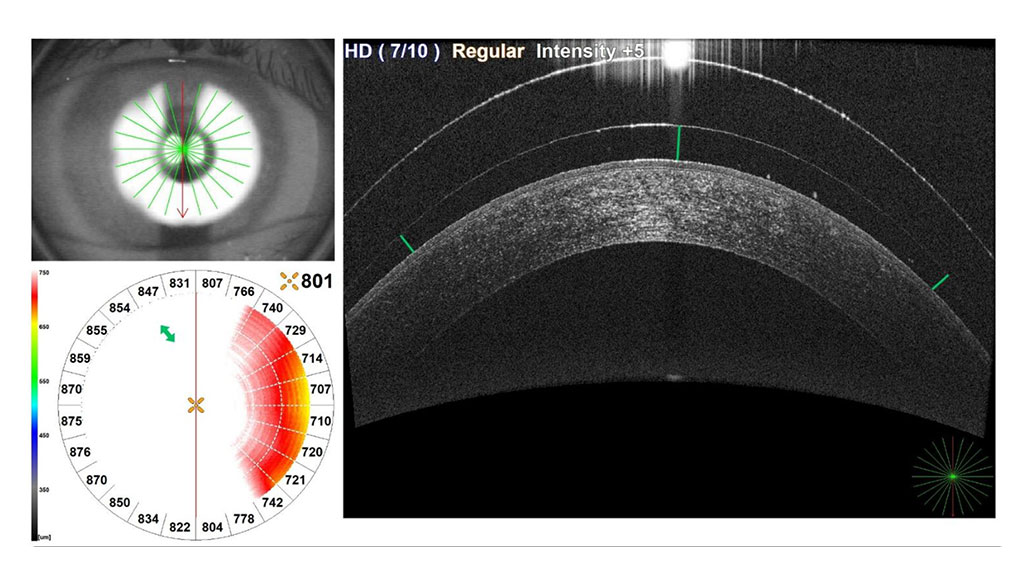
OCT scan along the steep axis of lens i.e. Flat axis markings at 0 and 180.
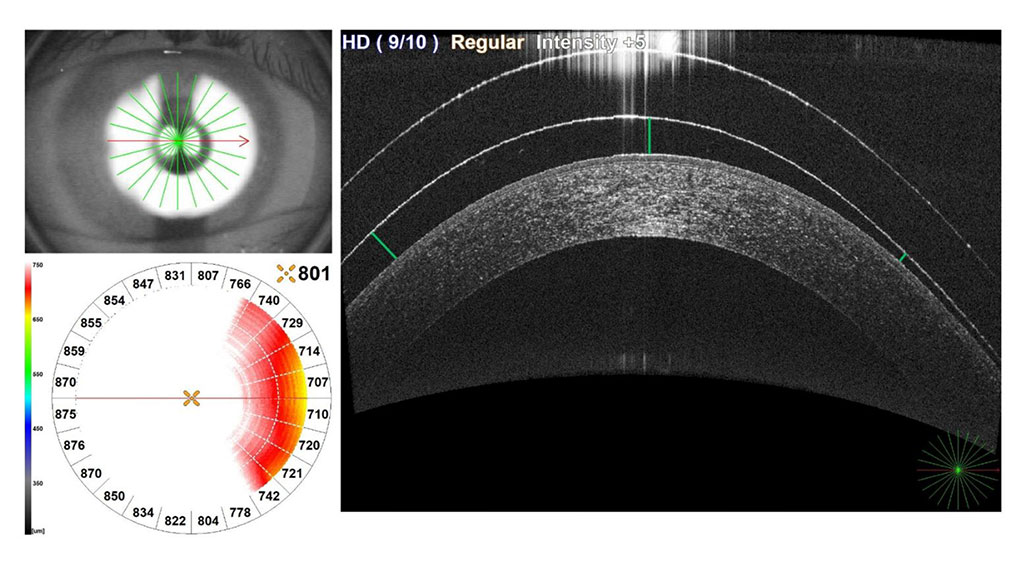
OCT scan along the flat axis of lens.
The following images show peripheral scans that show the limbal area and the landing zone of the lens, assuming the lens does not rotate.
Note: If the lens does rotate, all scans should be rotated to align with the flat and steep axis of the lens.
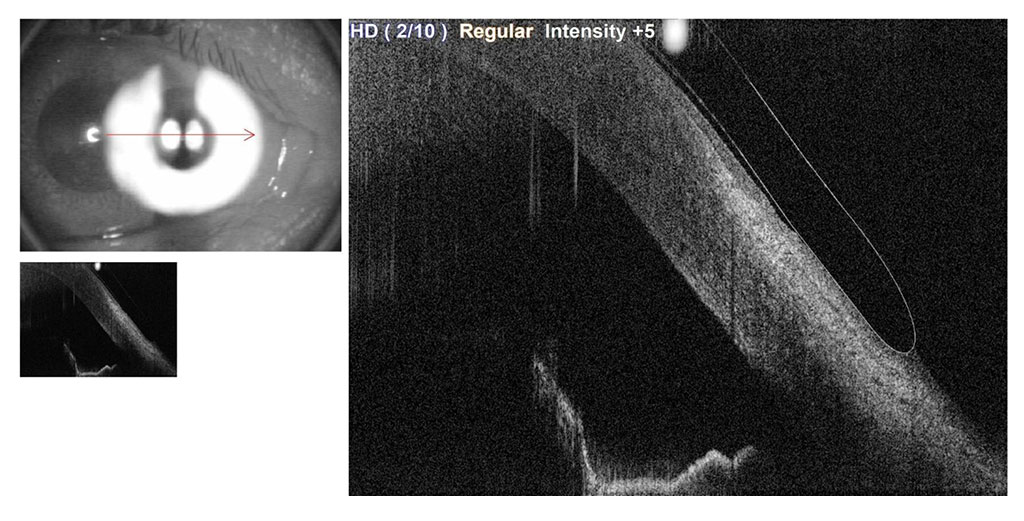
Peripheral OCT scan along axis 0, aligned with the flat axis of the lens.
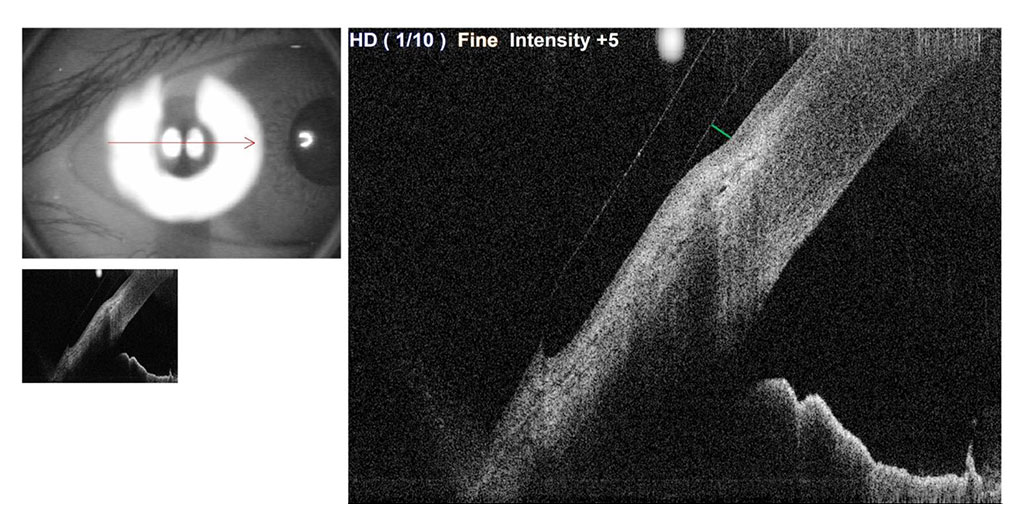
Peripheral OCT scan along axis 180, aligned with the flat axis of the lens.
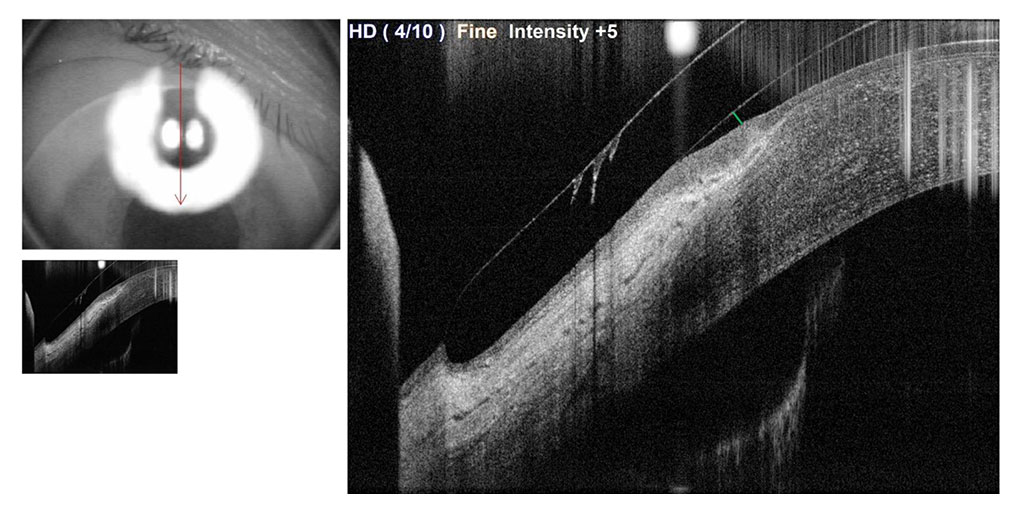
Peripheral OCT scan along axis 90, aligned with the steep axis of the lens.
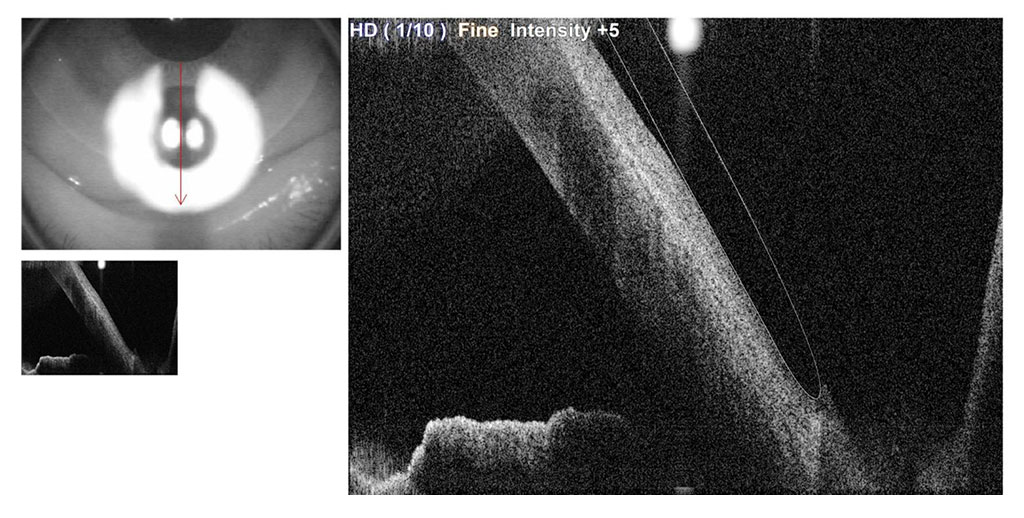
Peripheral OCT scan along axis 270, aligned with the steep axis of the lens.
WARRANTY
Corneal Lens Corporation NZ Ltd guarantees all CLC lenses against all defect in materials and workmanship for 30 days from the original invoice date.